
Few skills straddle the line between “basic life necessity” and “surprisingly intimidating” quite like tying a tie. Whether you’re gearing up for a job interview, a wedding, or your first day in a corporate office, knowing how to knot a tie properly can make the difference between looking sharp and looking like you got dressed in the dark. This guide breaks down everything you need to know — from choosing the right knot to fixing common mistakes — so you never have to fumble in front of a mirror again.
How to Get Black Screen on Instagram: A Complete Guide
Why Tie-Tying Still Matters
In an age of hoodies and “business casual,” you might wonder if this skill is even relevant anymore. It is — and here’s why:
- First impressions count. A well-tied tie signals attention to detail and confidence.
- It’s a life skill, not just a fashion choice. Weddings, funerals, graduations, and interviews all tend to call for one.
- A poorly tied knot is more noticeable than no tie at all. Lopsided, too-short, or overly bulky knots draw the wrong kind of attention.
- It only takes a few minutes to learn — and once learned, it’s muscle memory for life.
Know Your Tie Knots
Not all knots suit all occasions, collars, or tie fabrics. Here’s a quick breakdown of the most popular ones.
1. The Four-in-Hand
- The easiest and most versatile knot — great for beginners.
- Creates a slightly asymmetrical, narrow knot.
- Works well with almost any collar type.
- Ideal for everyday office wear or casual button-downs.
2. The Windsor Knot (Full Windsor)
- A larger, symmetrical, triangular knot.
- Best suited for wide-spread collars and formal settings.
- Popular for job interviews, board meetings, and weddings.
- Requires more length of tie, so it’s best with longer ties.
3. The Half-Windsor
- A happy medium between the Four-in-Hand and Full Windsor.
- Neat, moderately sized, and symmetrical.
- Works with most collar styles.
- A safe, professional default if you’re unsure which knot to pick.
4. The Pratt (Shelby) Knot
- A clean, symmetrical, mid-sized knot.
- Tied with the tie starting inside-out (lining facing outward at first).
- Good for narrow ties and slim-fit shirts.
5. The Bow Tie
- Reserved for black-tie events, tuxedos, and formal celebrations.
- Takes practice, but pre-tied and clip-on options exist for beginners.
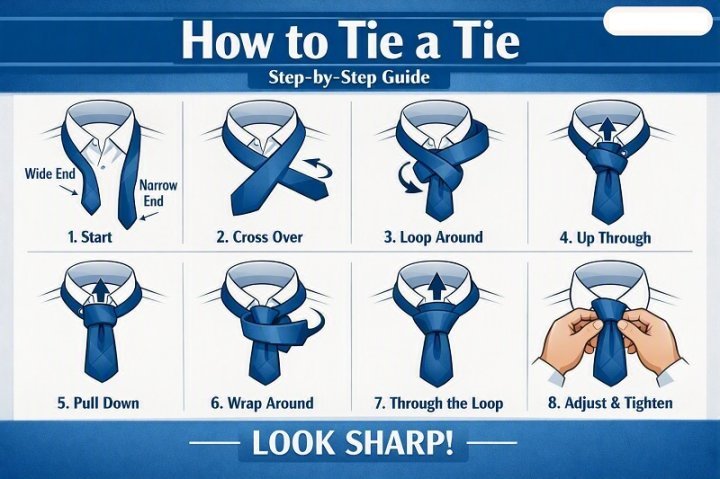
Step-by-Step: Tying the Four-in-Hand Knot
Since this is the most common starting point, here’s a detailed walkthrough:
- Drape the tie around your neck, wide end on your dominant side, hanging about 12 inches lower than the narrow end.
- Cross the wide end over the narrow end, forming an “X” just below your collar.
- Bring the wide end underneath the narrow end and pull it up through the loop near your neck.
- Pull the wide end back down so it’s now hanging in front, next to the narrow end.
- Bring the wide end across the front of the narrow end, moving from left to right (or right to left, depending on your setup).
- Push the wide end up through the neck loop again, from behind.
- Guide the wide end down through the knot you just created in front.
- Hold the narrow end and gently tighten the knot by sliding it upward toward the collar.
- Adjust for symmetry and tighten the top button of your collar around the knot.
- Check the length — the tip of the tie should just graze the top of your belt buckle.
Pro Tips for a Flawless Finish
- Get the length right first. Before tying, hold the wide end so it hangs a few inches below where you want the finished tie to sit — adjust as you go.
- Use a mirror, not your phone camera. Direct visual feedback helps you correct asymmetry in real time.
- Practice with an old tie. Repetition builds muscle memory faster than reading instructions alone.
- Match the knot to your collar. Spread collars need bigger knots (Windsor); narrow collars need smaller ones (Four-in-Hand).
- Don’t over-tighten. A snug but breathable knot looks better and feels more comfortable through a long day.
- Create a dimple. Right after tightening, pinch the fabric just below the knot to form a subtle indentation — a small detail that adds polish.
- Check tie-to-belt alignment before you leave. The tip should hit right at your belt line, not above or dangling below it.
Common Mistakes to Avoid
- Tying it too short or too long — always adjust the starting length before you begin looping.
- Skipping the dimple — it’s a small touch, but it elevates the entire look.
- Using a knot too big for a slim collar, which can look bulky and overwhelm your neckline.
- Forgetting to loosen the tie before removing it — always undo the knot instead of pulling it over your head to preserve the fabric.
- Ignoring tie material — silk ties hold knots differently than knitted or polyester ones; thicker fabrics need smaller knots.
Matching Your Tie to the Occasion
- Job interviews: Half-Windsor or Windsor, solid or subtly patterned tie in navy, burgundy, or grey.
- Weddings (guest): Four-in-Hand or Half-Windsor, with color coordinated to the event’s dress code.
- Formal black-tie events: Bow tie, always.
- Everyday office wear: Four-in-Hand for comfort and speed.
- Funerals: Simple knot, solid black or dark-toned tie, minimal embellishment.
Final Thoughts
Tying a tie isn’t about following rigid rules — it’s about understanding a few key principles (knot size, collar type, and proportion) and then practicing until it becomes second nature. Start with the Four-in-Hand if you’re new to this, work your way up to the Windsor for more formal events, and always remember: a well-tied knot with a neat dimple says more about your attention to detail than any suit label ever could.
Once you’ve mastered the basics, experiment with different knots for different shirts and occasions — it’s a small skill that pays off in every professional and personal setting you’ll ever dress up for.
