
Taking a screenshot on a Mac feels like it should be simple — and once you know the shortcuts, it is. But between capturing a full screen, grabbing just a portion, screenshotting a specific window, or recording your screen entirely, macOS actually offers a surprising number of options. This guide walks through every method, tool, and trick so you can capture exactly what you need, exactly how you want it.
Why Knowing These Shortcuts Matters
- Screenshots are essential for everyday tasks — sharing error messages, saving receipts, documenting bugs, or creating tutorials.
- macOS has multiple built-in methods, and using the right one saves time and avoids messy edits later.
- Third-party apps aren’t necessary for most use cases — Apple’s native tools cover nearly everything.
- Newer macOS versions added more flexibility, including a floating toolbar, screen recording, and cloud/annotation options.
The Core Screenshot Shortcuts
These are the foundational key combinations every Mac user should memorize.
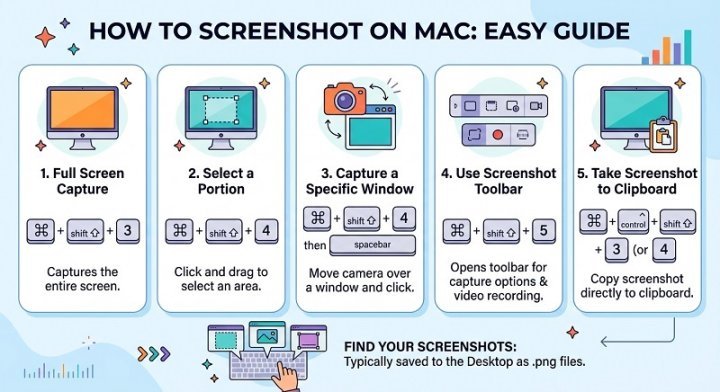
1. Capture the Entire Screen
- Press Shift + Command + 3.
- Instantly captures everything visible on your display.
- A thumbnail appears briefly in the bottom-right corner — click it to edit, or ignore it to save automatically.
- If you have multiple monitors, this captures all screens as separate image files.
2. Capture a Selected Portion
- Press Shift + Command + 4.
- Your cursor turns into a crosshair; click and drag to select the area you want.
- Release the mouse to capture, or press Esc to cancel.
- Hold Space after starting the selection to move the entire selection box instead of resizing it.
3. Capture a Specific Window
- Press Shift + Command + 4, then press Space bar.
- The cursor turns into a camera icon; hover over any open window to highlight it.
- Click to capture just that window, complete with a subtle drop-shadow border.
- Great for clean, professional-looking screenshots without background clutter.
4. Capture Using the Screenshot Toolbar (macOS Mojave and later)
- Press Shift + Command + 5.
- Opens a floating toolbar with options to capture the full screen, a window, or a selected portion.
- Also includes screen recording options (full screen or selected portion).
- Lets you set a capture timer (5 or 10 seconds) and choose a save destination before capturing.
Where Do Screenshots Go?
- By default, screenshots save directly to the Desktop as PNG files.
- You can change the save location using the Shift + Command + 5 toolbar → Options menu.
- Available destinations include Desktop, Documents, Clipboard, Mail, Messages, Preview, or a custom folder.
- Choosing Clipboard lets you paste the screenshot directly into another app without saving a file at all.
Editing and Annotating Screenshots
- After capturing, click the thumbnail preview in the corner before it disappears (usually within a few seconds).
- This opens Markup mode, where you can:
- Crop the image
- Draw shapes, arrows, or freehand lines
- Add text or callouts
- Highlight specific areas
- Adjust color and line thickness
- Once edited, you can share directly via Mail, Messages, AirDrop, or save it to Files.
Screenshotting the Touch Bar (Older MacBook Pros)
- Press Shift + Command + 6 to capture whatever is currently displayed on the Touch Bar.
- Useful for tutorials or documentation involving Touch Bar-specific features.
Screen Recording on Mac
- Press Shift + Command + 5 to open the toolbar, then select either:
- Record Entire Screen
- Record Selected Portion
- Click Record to begin; a small stop icon appears in the menu bar.
- Click the stop icon (or press Command + Control + Esc) to end the recording.
- Recordings save as .mov files and can also be edited afterward using the Markup tools.
Useful Tips and Tricks
- Copy instead of save: Add the Control key to any screenshot shortcut (e.g., Shift + Command + Control + 4) to copy the screenshot to your clipboard instead of saving it as a file.
- Capture menus and tooltips: Use the window-capture method (Shift + Command + 4, then Space) for clean captures of dropdown menus.
- Change file format: By default, Mac saves screenshots as PNG, but you can switch to JPG, TIFF, or PDF using Terminal commands if needed.
- Disable the floating thumbnail: If the preview thumbnail is distracting, you can turn it off in System Settings under Screenshot preferences, though most users find it handy for quick edits.
- Use Preview for advanced editing: Screenshots saved as files can be opened in the Preview app for more detailed markup, resizing, or format conversion.
- Rename files quickly: Since Mac names screenshots with a timestamp by default (e.g., “Screenshot 2026-08-03 at 10.15.42 AM”), consider renaming important ones immediately to keep them organized.
Common Mistakes to Avoid
- Forgetting to release Space before dragging when repositioning a selection — this can accidentally resize instead of move the capture area.
- Not checking the save location, especially if your Desktop screenshots pile up unnoticed.
- Overwriting the clipboard unintentionally when using the Control-modifier shortcut, especially if you meant to save a file instead.
- Ignoring the Markup tool, which can save time compared to opening a separate image editor for basic edits like cropping or highlighting.
When to Use Third-Party Tools
While built-in shortcuts cover most needs, certain situations call for more advanced software:
- Scrolling screenshots (capturing an entire webpage, not just the visible portion) — tools like CleanShot X or Skitch handle this well.
- Advanced annotation features, such as blurring sensitive information or adding numbered steps for tutorials.
- Cloud-based sharing with automatic link generation for team collaboration.
- Batch screenshot organization for content creators or QA testers handling large volumes of captures.
Final Thoughts
macOS offers one of the most flexible built-in screenshot systems of any operating system — covering full screens, custom selections, specific windows, and even screen recordings, all without installing additional software. Once you commit the core shortcuts to memory — Shift + Command + 3, 4, and 5 — capturing exactly what you need becomes second nature. For more advanced workflows, third-party tools can fill in the gaps, but for the vast majority of everyday tasks, Apple’s native tools are more than capable of getting the job done quickly and cleanly.
