
Drivers are the small pieces of software that let your operating system communicate with hardware components like graphics cards, printers, network adapters, and USB devices. Over time, your computer can accumulate outdated, corrupted, or conflicting drivers — leading to system errors, poor performance, or hardware that simply refuses to work correctly.
Knowing how to delete drivers properly is an essential troubleshooting skill for anyone who wants a stable, efficient computer. This guide walks you through every reliable method, from built-in Windows tools to command-line options, along with tips to avoid common mistakes.
Why You Might Need to Delete a Driver
Before diving into the “how,” it helps to understand the “why.” Common reasons people delete drivers include:
- Fixing hardware conflicts: Two drivers competing for the same resources can cause crashes or malfunctions.
- Resolving the “Yellow Triangle” error: A warning icon in Device Manager usually signals a driver problem.
- Preparing for a clean reinstall: Sometimes the best fix is to remove a driver completely and let Windows or the manufacturer reinstall a fresh copy.
- Removing old GPU drivers: Gamers and creators often need to fully wipe graphics drivers before installing a new version to avoid instability.
- Uninstalling unused hardware drivers: Old printer or webcam drivers can linger long after you’ve stopped using the device.
Whatever your reason, it’s important to follow the correct steps to avoid accidentally breaking essential system functions.
Method 1: Delete Drivers Using Device Manager
Device Manager is the most common and beginner-friendly way to remove a driver.
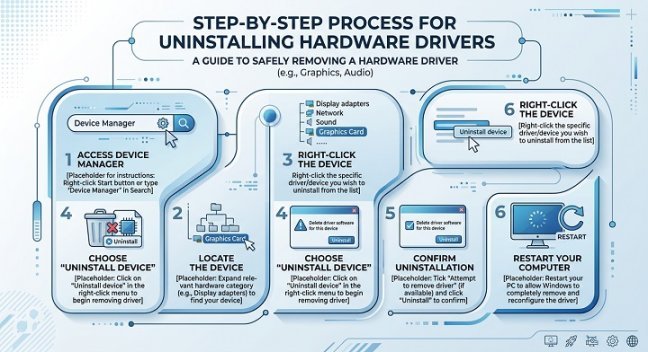
- Open Device Manager: Right-click the Start button and select “Device Manager,” or search for it in the Start menu.
- Locate the device: Expand the relevant category (e.g., “Display adapters,” “Printers,” “Network adapters”) and find the device whose driver you want to delete.
- Right-click and uninstall: Select “Uninstall device.”
- Check the checkbox: In the confirmation window, tick the box that says “Delete the driver software for this device.” This step is crucial — without it, Windows may just disable the driver rather than fully remove it.
- Confirm and restart: Click “Uninstall,” then restart your computer to complete the process.
After rebooting, Windows will often automatically reinstall a generic driver for the device. If you need a specific version, download it manually from the manufacturer’s website afterward.
Method 2: Delete Drivers via Settings App
Windows 10 and 11 also let you manage some drivers directly through the Settings app, particularly useful for printers and optional features.
- Open Settings and go to Bluetooth & devices (or Devices on older builds).
- Select Printers & scanners or the relevant category.
- Click on the device you want to remove.
- Select Remove device, then confirm.
This method removes the device connection but may not always delete the underlying driver package. For a full removal, pair this with Method 3 below.
Method 3: Remove Driver Packages Using the Control Panel
To ensure a driver package is completely wiped from your system (not just disconnected from a device), use the classic Control Panel:
- Open Control Panel and navigate to Programs > Programs and Features.
- Look for the driver or hardware software in the list (many manufacturers, like NVIDIA or Realtek, list their drivers here).
- Right-click and select Uninstall.
- Follow the on-screen prompts, and restart your computer when finished.
This method is especially effective for graphics drivers, audio drivers, and chipset drivers that come with their own installer packages.
Method 4: Delete Drivers Using Command Prompt or PowerShell
For more advanced users, deleting drivers via command-line tools offers precision and is useful when the graphical interface won’t cooperate.
- Open Command Prompt as Administrator.
- Run the following command to list all installed driver packages:
pnputil /enum-drivers- Identify the driver you want to remove by its Published Name (formatted like
oem12.inf). - Delete it using:
pnputil /delete-driver oem12.inf /uninstall- Restart your computer to finalize the removal.
This method is particularly helpful for removing “orphaned” driver packages that no longer correspond to connected hardware but still take up space in the driver store.
Method 5: Use a Dedicated Driver Removal Tool (For GPUs)
If you’re dealing with graphics card drivers specifically, a standard uninstall sometimes leaves behind residual files and registry entries that cause conflicts with new installations. In these cases, dedicated cleanup utilities from GPU manufacturers or trusted third-party tools designed for this purpose can perform a deeper clean than Windows’ built-in options. Always download such tools directly from official manufacturer websites to avoid malware risks.
Tips to Avoid Problems When Deleting Drivers
- Create a restore point first: Before removing any driver, especially chipset or graphics drivers, create a System Restore point. This gives you a safety net if something goes wrong.
- Know which drivers are safe to remove: Avoid deleting drivers for essential components like your motherboard chipset or storage controllers unless you’re specifically troubleshooting them and have a replacement ready.
- Download replacement drivers in advance: If you’re removing a driver to reinstall a fresh version, download the correct driver package from the manufacturer’s website before you begin, especially for network adapters — you’ll need internet access to redownload it otherwise.
- Use Safe Mode for stubborn drivers: Some drivers, particularly graphics drivers, are easier to remove when Windows is booted in Safe Mode, since the driver isn’t actively running.
- Check Device Manager after deletion: Confirm the device either reinstalled correctly with a generic driver or shows as removed, depending on your goal.
Common Mistakes to Avoid
- Forgetting to check “Delete the driver software”: Simply uninstalling a device in Device Manager without this option often leaves the driver files intact.
- Deleting drivers for devices you still need: Double-check device names before removing anything, especially in categories with generic-sounding entries.
- Skipping the restart: Many driver changes don’t take full effect until the system reboots.
- Ignoring manufacturer uninstallers: For complex drivers like GPU or audio drivers, always use the manufacturer’s uninstaller if one is available rather than relying solely on Device Manager.
Final Thoughts
Deleting drivers doesn’t have to be intimidating once you understand the right tools for the job. Device Manager works well for quick, everyday removals, while Command Prompt and dedicated cleanup tools offer more thorough solutions for stubborn or leftover driver files. Whichever method you choose, taking a few precautionary steps — like creating a restore point and having a replacement driver ready — will help ensure the process goes smoothly and keeps your system running reliably.
