
To change a tire: park on flat ground, turn on hazard lights, loosen the lug nuts slightly, jack up the car, remove the lug nuts and flat tire, mount the spare, hand-tighten the lug nuts in a star pattern, lower the car, and fully tighten the nuts. The whole process takes most beginners 15–30 minutes.
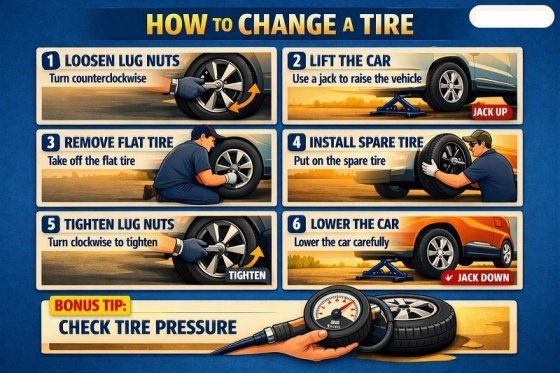
Why Every Driver Should Know How to Change a Tire
A flat tire rarely happens at a convenient time. It might strike on a quiet highway with no cell signal, in a parking lot before an important meeting, or on a family road trip miles from the nearest service station. Roadside assistance isn’t always fast — or available. Knowing how to change a tire yourself means you’re never stuck waiting, and it can save you both time and money.
The good news: changing a tire doesn’t require mechanical expertise. It requires the right tools, a calm approach, and about 10 straightforward steps. This guide walks beginners through the entire process, from spotting a flat to driving away safely.
Tools You Need to Change a Tire
Before you’re on the side of the road, it helps to know exactly what’s involved. Most cars come equipped with everything you need in the trunk or under the cargo floor.
Essential tools:
- Spare tire – properly inflated and in good condition
- Car jack – usually stored with the spare
- Lug wrench – used to loosen and tighten lug nuts
- Vehicle owner’s manual – for jack points and torque specs
Helpful extras (optional but recommended):
- Wheel wedges or bricks (to stop the car from rolling)
- A flashlight (for low-light situations)
- Reflective triangles or road flares
- Gloves (to keep your hands clean and protected)
- A tire pressure gauge
If any of these are missing from your car, it’s worth adding a small emergency kit to your trunk before you need it.
Step 1: Pull Over Safely
The moment you notice a flat — a thumping sound, a pulling sensation, or a dashboard warning — ease off the accelerator and avoid braking hard. Turn on your hazard lights immediately so other drivers see you.
Look for a flat, stable surface away from moving traffic: a parking lot, shoulder, or side street. Avoid soft ground like grass or gravel, since it can cause the jack to sink. Once stopped, put the car in park (or first gear for manual transmissions) and engage the parking brake.
Step 2: Set Up for Safety
Before touching any tools, place wheel wedges or heavy objects behind the tires that are staying on the ground, opposite the flat. This prevents the car from rolling while it’s jacked up. If you have reflective triangles, set them a safe distance behind your car, especially on busy roads.
Step 3: Gather Your Tools
Retrieve the spare tire, jack, and lug wrench from your trunk. Lay them near the flat tire so everything is within reach once you start.
Step 4: Loosen the Lug Nuts
Using the lug wrench, turn each lug nut counterclockwise about a quarter turn — just enough to break the resistance. Do this before lifting the car; it’s far harder to loosen lug nuts once the tire is off the ground and spinning freely. If your wheel has a hubcap, remove it first to access the nuts.
Step 5: Position and Raise the Jack
Check your owner’s manual for the correct jack point — usually a reinforced spot along the vehicle’s frame near the flat tire. Placing the jack incorrectly can damage your car or make it unstable. Once positioned, crank the jack until the flat tire is a few inches off the ground.
Step 6: Remove the Lug Nuts and Tire
With the car raised, finish unscrewing the lug nuts by hand and set them aside somewhere they won’t roll away (a hubcap works well as a tray). Grip the tire firmly and pull it straight toward you to remove it from the wheel hub.
Step 7: Mount the Spare Tire
Lift the spare tire and align its holes with the wheel bolts. Push it onto the hub until it sits flush. Avoid spinning the tire while it’s unsecured — get it seated properly first.
Step 8: Hand-Tighten the Lug Nuts
Screw each lug nut on by hand, tightening them in a star or crisscross pattern rather than in a circle. This ensures the wheel sits evenly on the hub and prevents wobbling later.
Step 9: Lower the Car and Fully Tighten
Carefully lower the jack until the tire touches the ground but still carries only partial weight. Use the lug wrench to tighten the nuts firmly, again following the star pattern. Once secure, lower the car completely and give the nuts one final, firm tightening pass — your body weight on the wrench is usually enough leverage.
Step 10: Pack Up and Check the Spare
Store the flat tire, jack, and wrench back in your trunk. Before driving off, do a quick visual check that the spare is properly seated and the lug nuts are tight. If you have a tire pressure gauge, confirm the spare is inflated to the recommended PSI (found in your manual or on the driver’s door jamb).
Important Safety Tips
- Never get under the car while it’s supported only by a jack.
- Don’t change a tire on a slope, curve, or narrow shoulder if you can help it — move to a safer spot first, even if it means driving slowly on the flat for a short distance.
- Most spare tires are temporary (“donut” spares) and aren’t rated for high speeds or long distances. Stick to around 50 mph (80 km/h) and get your regular tire repaired or replaced as soon as possible.
- Recheck lug nut tightness after driving about 50 miles (80 km), since nuts can settle slightly after a tire change.
Frequently Asked Questions
How long does it take to change a tire?
Most beginners can change a tire in 15–30 minutes. With practice, it can take under 10 minutes.
Do I need any special skills to change a tire?
No. Changing a tire only requires basic tools, some physical effort, and following the steps in order. No mechanical training is needed.
Which way do you turn a lug nut to loosen it?
Counterclockwise loosens a lug nut; clockwise tightens it. This follows the standard “righty-tighty, lefty-loosey” rule.
Can I drive on a spare tire long-distance?
It’s not recommended. Most spare tires are designed for short-term use at reduced speeds (typically under 50 mph) until you can replace or repair the damaged tire.
What if the tire won’t come off the hub?
This is often caused by rust or corrosion. Try spraying a penetrating lubricant around the hub, or gently tap the tire with a rubber mallet to loosen it.
What do I do if I don’t have a spare tire?
If your car doesn’t include a spare, check for a tire repair kit or run-flat tires — both common in newer vehicles. Otherwise, call roadside assistance.
Final Thoughts
Changing a tire is one of those skills that feels intimidating until you’ve done it once — after that, it becomes second nature. Keep your spare tire properly inflated, your jack and wrench accessible, and your owner’s manual handy, and you’ll be ready to handle a flat with confidence wherever it happens.
